Chapter 2 - Solid Clipboard
Introduction
In this tutorial we will cover how to load and save data to a Personal Online Datastore (Pod). The app is a simple web clipboard that allows you to save data to a store and then recover it later.
What you will learn
- How to set up rdflib.js to work with the web of data
- How to read data from a Pod
- How to write data to a Pod
- How to change the location of the URL you are using
- How to change query string to allow bookmarking
- How to use the
#thispattern - How to use the
urn:tmp:pattern
The App
This app builds on the previous hello world app, which enables login and logout by introducing Personal Data Stores (Pods) and allowing read and write to those stores using rdflib.js. The app operates as a simple web clipboard that lets you save text to a location and retrieve it later.
The first thing that we will do is set up rdflib.js. It is sourced in to index.html
<script src="vendor/rdflib.min.js"></script>
After sourcing in the library, the first thing to do is to initialize a knowledge base graph, and a fetcher. This is done using the $rdf global variables.
    g = $rdf.graph();
    f = $rdf.fetcher(g);
The variable g will contain everything that is fetched using the fetcher, and also meta data about the documents that have been fetched. The variable f can be used to fetch documents.
For convenience some common namespaces are set up so that vocabs can be called conveniently with a shorthand using $rdf.Namespace
  var CHAT  = $rdf.Namespace("https://ns.rww.io/chat#");
  var CURR  = $rdf.Namespace("https://w3id.org/cc#");
  var DCT   = $rdf.Namespace("http://purl.org/dc/terms/");
  var FACE  = $rdf.Namespace("https://graph.facebook.com/schema/~/");
  var FOAF  = $rdf.Namespace("http://xmlns.com/foaf/0.1/");
  var LIKE  = $rdf.Namespace("http://ontologi.es/like#");
  var LDP   = $rdf.Namespace("http://www.w3.org/ns/ldp#");
  var MBLOG = $rdf.Namespace("http://www.w3.org/ns/mblog#");
  var OWL   = $rdf.Namespace("http://www.w3.org/2002/07/owl#");
  var PIM   = $rdf.Namespace("http://www.w3.org/ns/pim/space#");
  var RDF   = $rdf.Namespace("http://www.w3.org/1999/02/22-rdf-syntax-ns#");
  var RDFS  = $rdf.Namespace("http://www.w3.org/2000/01/rdf-schema#");
  var SIOC  = $rdf.Namespace("http://rdfs.org/sioc/ns#");
  var SOLID = $rdf.Namespace("http://www.w3.org/ns/solid/app#");
  var TMP   = $rdf.Namespace("urn:tmp:");
Next, we want to pull in the data, so we use the nowOrWhenFetched function of the fetcher to get data from Pod.
Before we can do this we must determine the location from the query string or from a default as follows, using the angularJS search function:
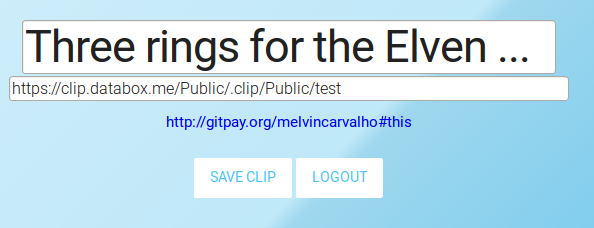
    var storageURI = 'https://clip.databox.me/Public/.clip/Public/test';
    if ($location.search().storageURI) {
      storageURI = $location.search().storageURI;
    }
For this app, the document is assumed to contain data of the form
<#this> <urn:tmp:clipboard> "data" .
The data above uses the turtle notation. The #this subject is used to distinguish between document and data, and is similar to the 'this' keyword in JavaScript.
A best practice would be to mint an HTTP URI for the predicate. But for ease of demonstration purposes, a temporary URN is used at under the scheme urn:tmp:. It is advisable always to use HTTP URIs, rather than schemes such as urn:, when dealing with linked data, this will be covered in the next tutorial.
Now we can fetch the data:
    f.nowOrWhenFetched(storageURI, undefined, function(ok, body) {
      var clipboard = g.any($rdf.sym(storageURI + '#this'), TMP('clipboard'));
      $scope.clipboard = clipboard;
      $scope.storageURI = storageURI;
    });
The nowOrWhenFetched will call a callback either if the document is loaded in the graph, or once it is fetched from the web. The $rdf.sym function simply changes a string into a URI by placing angle brackets around it. We use the function g.any to get the object of the namespace TMP of value 'clipboard'.
Once we have fetched this data we can set it to the screen, and also set the storageURI which has come back successfully.
To save the clipboard we issue a PUT request to the server.
    $http({
        method: 'PUT',
        url: $scope.storageURI,
        withCredentials: true,
        headers: {
            "Content-Type": "text/turtle"
        },
        data: '<#this> <urn:tmp:clipboard> """' + clipboard + '""" .',
    }).
    success(function(data, status, headers) {
      $scope.notify('clipboard saved');
      $location.search('storageURI', $scope.storageURI);
    }).
    error(function(data, status, headers) {
      $scope.notify('could not save clipboard', 'error');
    });
The line
$location.search('storageURI', $scope.storageURI);
Changes the query string to the storage URI so that the clipboard can be bookmarked, or shared. It is important on the web that URIs reflect the state of a given app. Astute observers will also note that the address bar now becomes an input form where changing the query string can change the content.
Putting this all together it should be possible to see a demo as follows:
The default location for storing the clip in this demo is public https://clip.databox.me/Public/.clip/Public/test but in practice you would want to store data in a private workspace under your storage root. Automatically finding endpoints will be covered in future. See Appendix B for more details.
A typical location could be
<storage>/Private/.clip/clip1
Summary
In this tutorial we learnt how to set up rdflib.js in order to read and write structured data to a personal data server. We looked at patterns for naming and functions to read, write, and allow bookmarking. In the next tutorial we will look at how to embed media in a webpage.